
Clover Sonoma's Meat and Cheese Plate
There is no recipe that screams flexibility like a cheese plate. You can literally use up any fruit and veggies, nuts, breads, meats and cheese that you have in your fridge and pantry. Our friends at Clover Sonoma have lots of great recipes on their website, and passed along this one written by Rachel Lightfoot Melby. Have yourself a an outdoor picnic or a carpet picnic depending on the weather. Finger foods like this are loved by all ages in the family.
 The Recipe
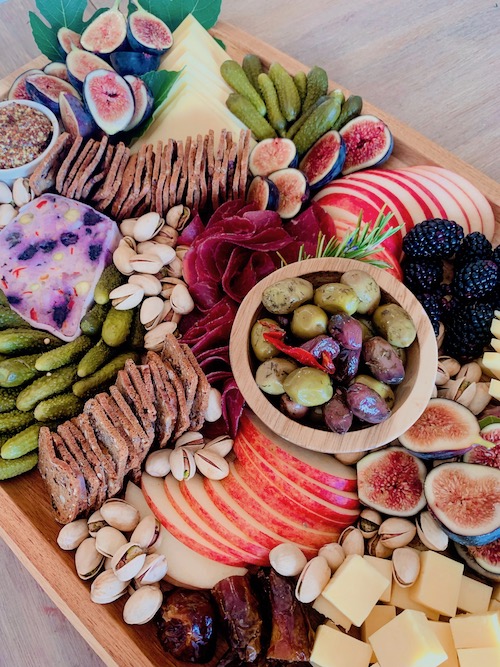
There is no wrong way to make a cheese plate! And here's how typical cheese boards start: With 2-3 different kinds of cheese, cured meats like salami and prosciutto, seasonal fruit, nuts and crackers or bread. Embellish with pickles and olives, condiments like mustard and honey, and garnishes like edible flowers and herbs.
Equipment
- A cutting board or large platter
- Plenty of small dishes to hold wet ingredients and condiments
- Cheese utensils- If using soft cheese, you’ll need a cheese or butter knife. If you cut pieces of hard cheese, consider offering toothpicks on the side.
Ingredients
You can use anything! Here are suggestions by Clover Sonoma.
- Cheeses
Clover Organic Sharp Cheddar (sliced)
Clover Organic Medium Cheddar (cubed)
Clover Organic Monterey (sliced) - Meats
Thistle Meats Bresaola
Thistle Meats Duck Mulberry Paté - Fruits and nuts
Grapes
Figs
Dried Dates
Blackberries
Gala Apples
Pistachios - Accoutrements
Cornichons
Mediterranean Olive Assortment
Crisp Fig Crackers
Seed mustard - Garnish
Fig leaves
Rosemary
Instructions
Prep your cheeses. Pro Tip: Know your texture/moisture level- sharp cheddar is a bit more firm and easy to make slices with, while the medium cheddar is perfect for cubing.
Layout your focal points: the cheese and ramekins will fit on your board. If you position these first, it is easier to then build around them. Odd numbers of focal points look attractive, so if you have two kinds of cheese, use one dish. If you have three types of cheese use two dishes.
Fill in the areas between your cheese with meats and sliced fruits. Pro Tips: Fan your fruit to show off as much color as possible. Consider organic, rounded layouts vs. laying everything in a straight row. Add volume and texture to each slice of meat by folding it twice and standing it up in a neat row. It’s okay to move things around at this point or swap out ‘focal points’ once you can see how things are taking shape.
Once you have your structural ingredients laid out, it’s time to fill in the remaining areas of your board with additional fruits, nuts, and garnishes. Pro Tips: Consider leaving crackers off the board if you have wet ingredients that can make them soggy, or if you don't have room; it’s perfectly acceptable to rest them in another bowl nearby.
Enjoy!